
Fashion 911: 35+ Quick Repairs For Wardrobe Emergencies
Don’t you hate it when you’re searching for the perfect outfit and your go-to pieces have a little hole or a broken zipper? It’s beyond frustrating, especially if you’re in a hurry. Fortunately, you can apply several DIY clothing fixes to remedy the situation.
Numerous trendy DIY clothing hacks abound so you can confidently wear your outfits without worrying about a wardrobe malfunction. These easy tricks show you how to fix your clothes in minutes and make old clothing look fresh again.
No, throwing that gorgeous sweater with snags is unnecessary. You can quickly mend that, and we’ll show you how. You don’t need to be an expert DIYer to do most of the things on this list. Let’s get down to repairing and start reviewing the list of fashion mishaps saviors.
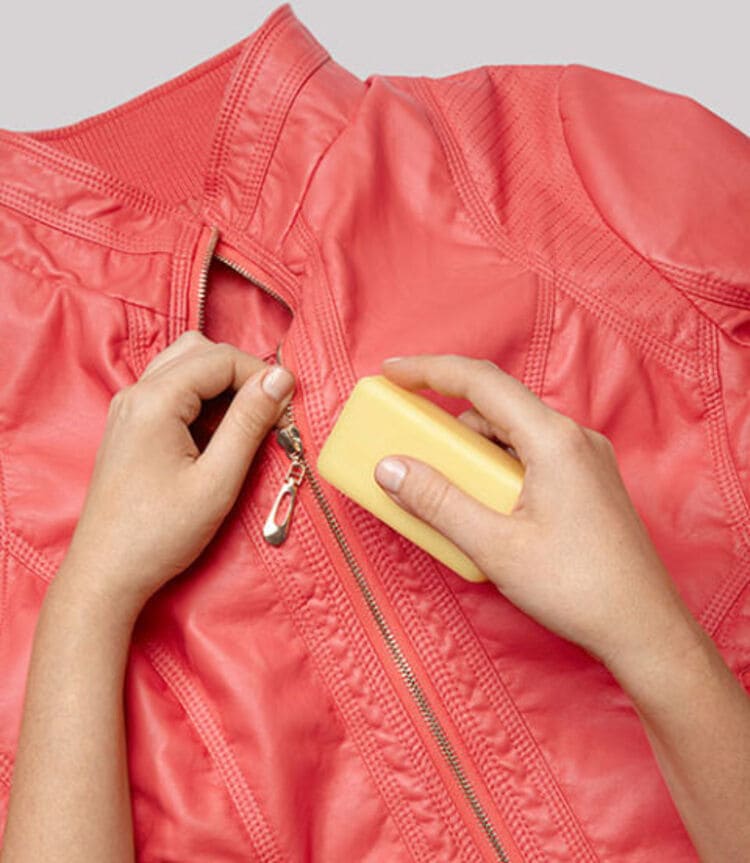
Broken Zipper
Don’t get rid of a fine outfit because of a broken zipper. Repairing it is easier than you think. You only need household lubricant, pliers, and patience. A slider upgrade is surprisingly simple. Bring your slider without a stamp to the sewing store to find a perfect match.
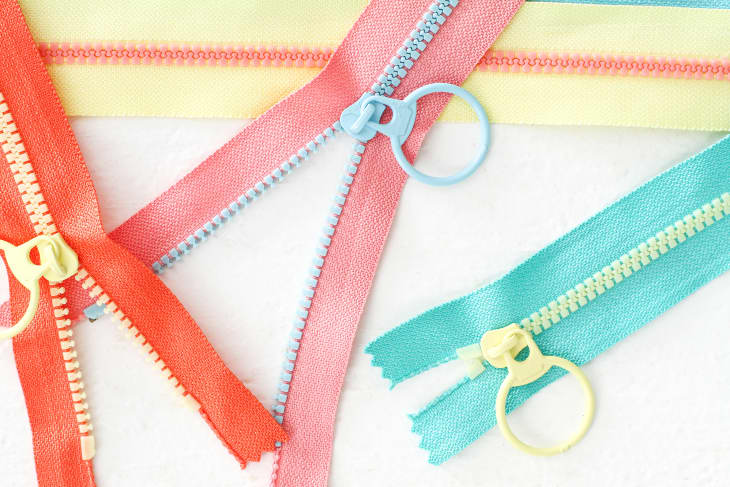
Use pliers to remove the “top stop” from your outfit gently. Pull the slider up and away from the zipper gently. Start applying the new slider to the clothing piece from where you removed the old one. With pliers, replace it with a new one for a stylish improvement.
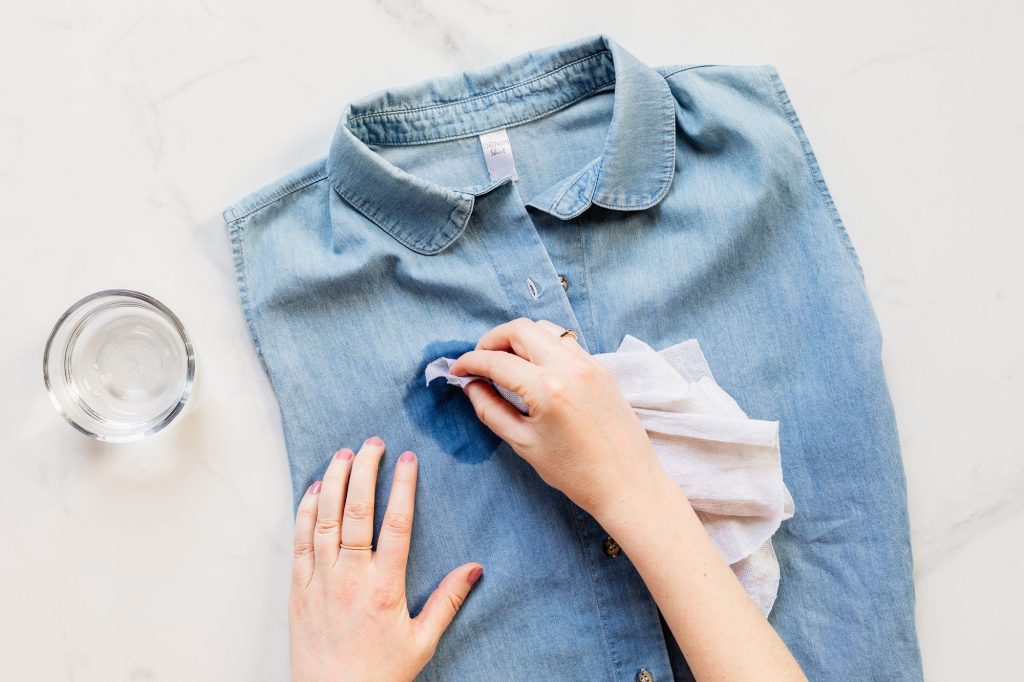
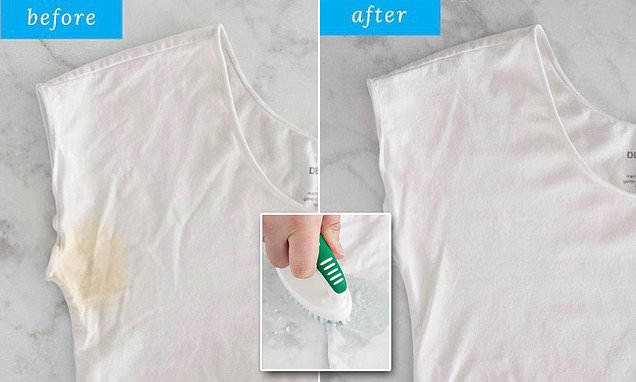
Coffee Stains
It’s a matter of trial and error to get rid of a coffee stain on your clothes, but speed is of the essence when dealing with it. Use cold water to flush. Next, try using laundry detergent and stain remover, and if those don’t work, call the professionals.

Cleaning coffee stains using a mixture of baking soda and water is one option, and it works like a charm. As you scrape baking soda into the stain, remember it is abrasive and could harm the cloth. In most cases, liquid soap is the best pick for washing your clothes.
Deodorant Marks
The mighty white vinegar is a versatile elixir that can banish pesky deodorant stains that cling to your favorite shirts. Say hello to a fresh, clean slate. Before you toss that stained T-shirt into the washing machine, let it luxuriate in a soothing vinegar bath for approximately an hour.
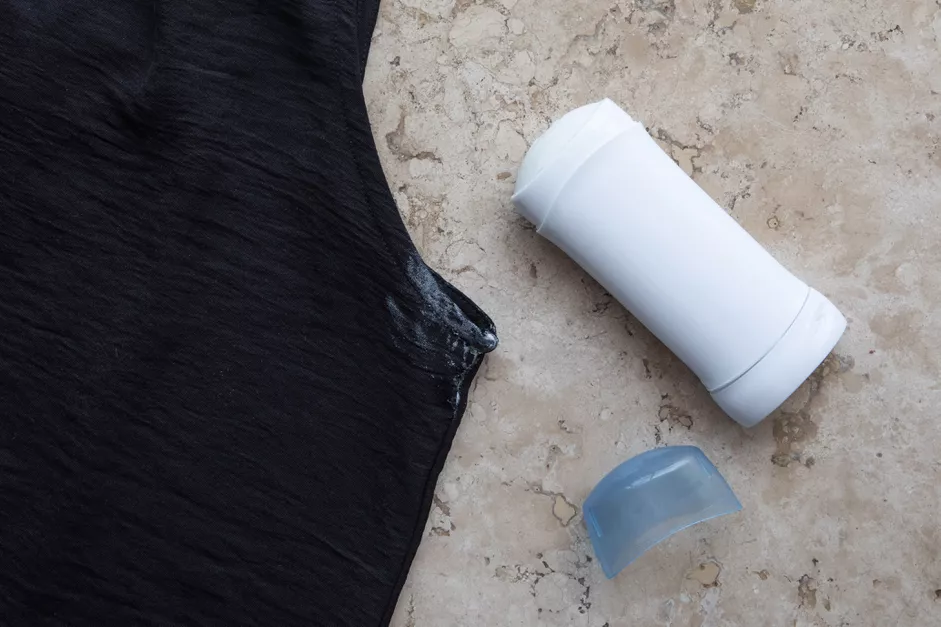
Then, armed with a trusty toothbrush, delicately brush away the remnants of the stain. Fear not, for vinegar works its magic on clothing of all colors. Embrace the transformative power of this household hero and bid farewell to stubborn stains forever.
Pet Hair
You can easily spot a pet lover by looking at their clothes for clues such as pet hair. It’s like a little annoying reminder of their furry pals. Fuzzy woolen items can be cleaned with a clothes steamer. You can also hang them in a steamy bathtub before brushing them.
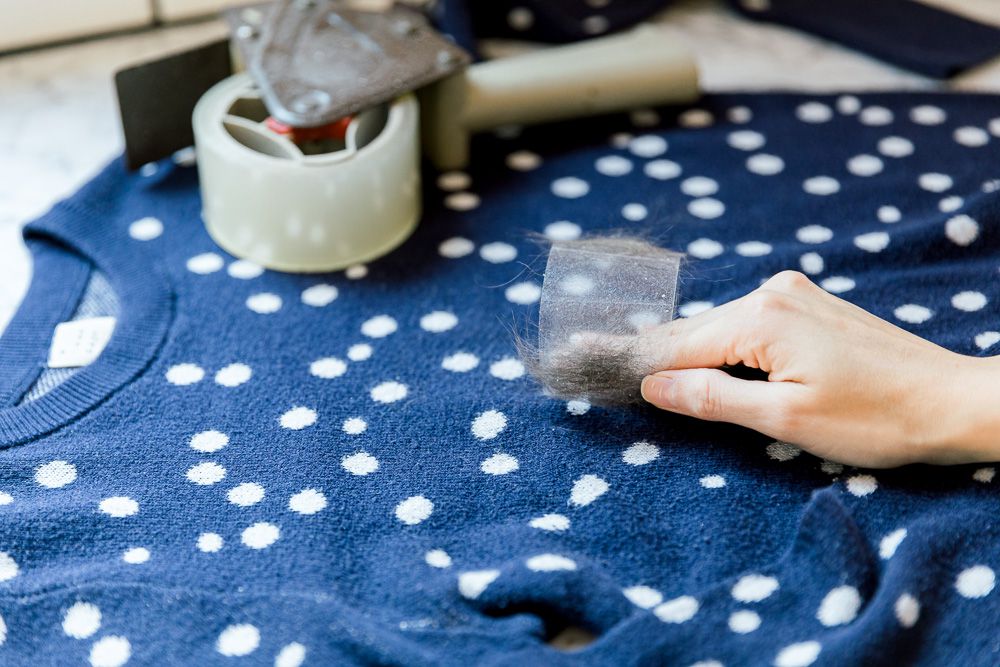
Pet hair can also be removed using a sticky clothes roller—a true classic. A simpler version of the roller is packing tape. Use it around your hand with the sticky side out. Another friendly solution is using dishwashing gloves. Wear it and rub your hands all over the fabric to pick up the fuzz.
Bobby Pins
What do you do when you realize your beloved jumper has been attacked by those irritating clothes moths, the arch-nemesis of all knitwear? If the damage isn’t that terrible, you can quickly fix it using a fusible bonding web. If the hole is bigger, then that’s a different story.
You can use a darning technique to fix the fabric by weaving it together with a bobby pin and thread. To get started, you’ll need a few things: a darning needle, some yarn in a color that matches or complements your fabric, darning support, and a pair of sewing scissors.
Ripped Jeans
Thigh rips in jeans are a constant battle for people who love this classic staple. Luckily, there’s a creative way to discreetly mend that denim thigh tear. The perfect trio—matching thread, a sewing machine with jeans or extra-sharp needle, and an assortment of stretch denim scraps. Just trust the process.
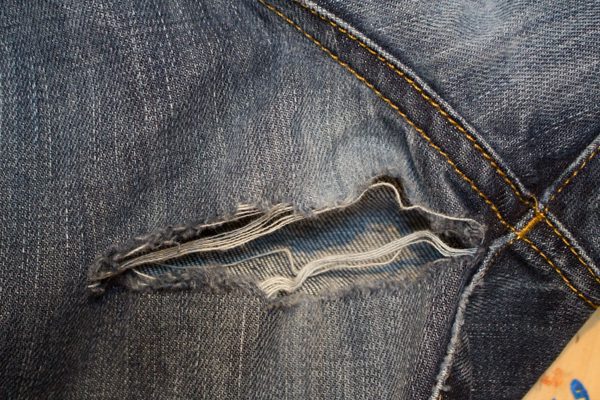
Widening the rip may seem counterintuitive, but it’s the key to a seamless repair. When cutting, go wider than the rip on all sides to give your cloth a trendy makeover with space for more flare. Close that rip and make it seem so neat that even the most careful fashionistas will be outraged.
Scratched Leather
Leather’s durability is well-known, but the markings are impossible to overlook when scraped. Small scratches can be repaired using leather oil or conditioner. Massage it gently in circles. Allow the oil to dry fully, then treat it with a leather conditioner to keep it lubricated. Vaseline is also a helpful option.
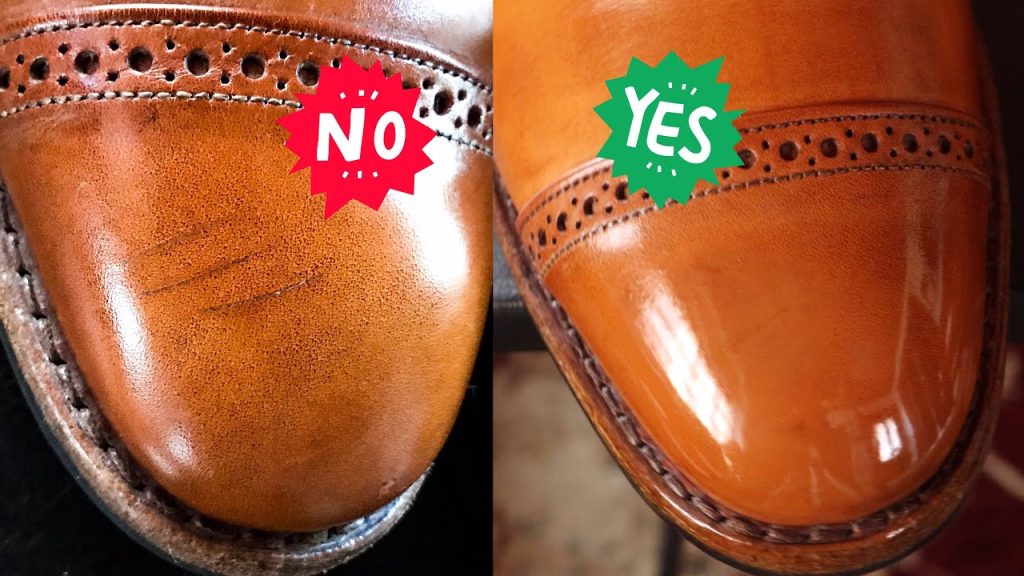
If the leather surface has a deeper scratch, use a leather cleaner. Apply it on a soft cloth and wipe. Then, dab the scratched area with distilled white vinegar carefully. The scratch may still annoy you, so dab a little olive oil and colorless shoe polish.
Socks
You want to throw out your beloved socks when the heel is worn out, or the toe is holed, but there’s no need. With a needle and thread, you can fix them in 3 minutes. Darning replaces the damaged cloth or patches a toe hole.
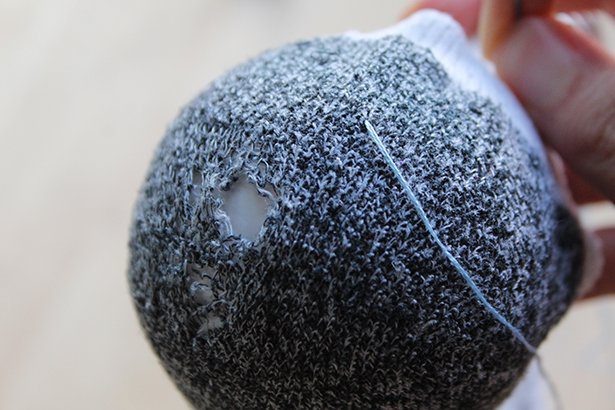
For those microscopic holes, use regular sewing thread. However, they may not be thick enough for larger sock holes. Yarn or embroidery thread can be used instead. The mended sock may be more comfortable if you darn on the outside so that the stitching won’t bother your skin.
Leather Belt
Some belts are too good to part with. But imagine a classic leather belt with holes. You buy it and find it’s too long—no need to cry about it. You can shorten it without ruining the design or leather. To remove the buckle, cut the thread and open the flap.
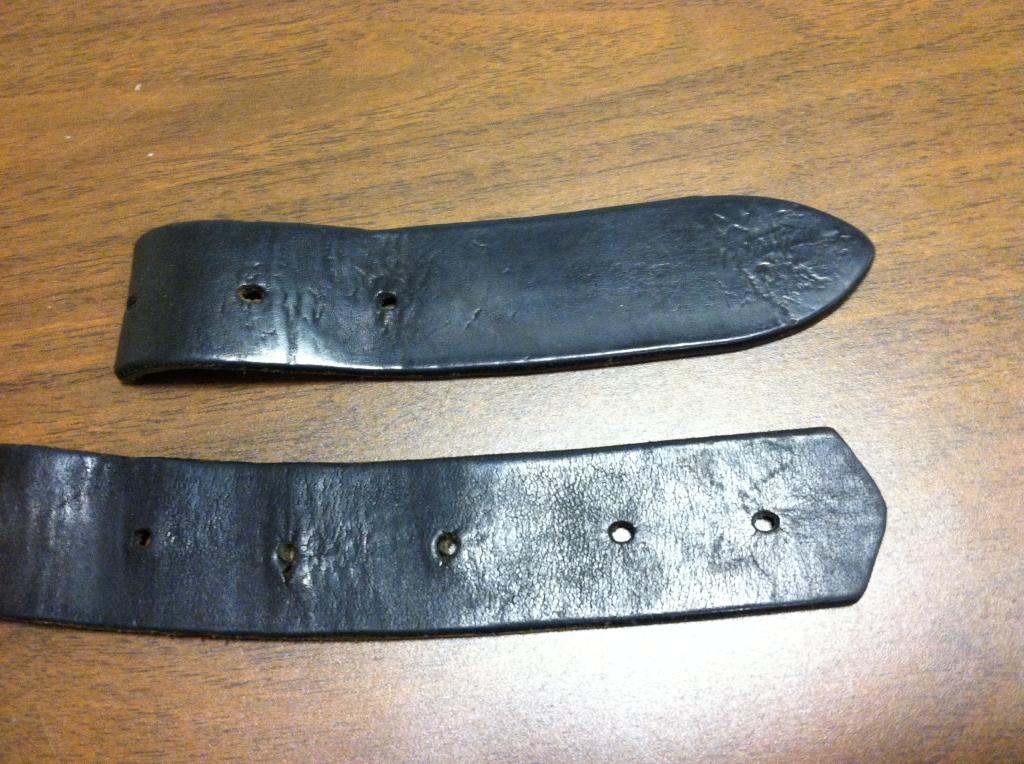
Measure the length of the belt around your waist to achieve the right fit. Next, cut the buckle-side belt leather. Just drill a belt-prong hole to simplify things. Use a leather hole punch or nail to achieve this. Insert the leather strap back into the buckle and sew it together after drilling a fresh hole.
Use A Stapler
If you’ve got an undone hem, a stapler can work pretty well for a quick fix. If you ever find yourself with a broken clasp on your pants or skirt, guess what? A staple can totally save the day. It works with more than just stationery.
Just pop one in there, and you’re good to go. No need to worry about finding a replacement clasp. It might not be a long-term solution, but if you have an accident during a busy day, it’ll help you keep going with as little disruption as possible.
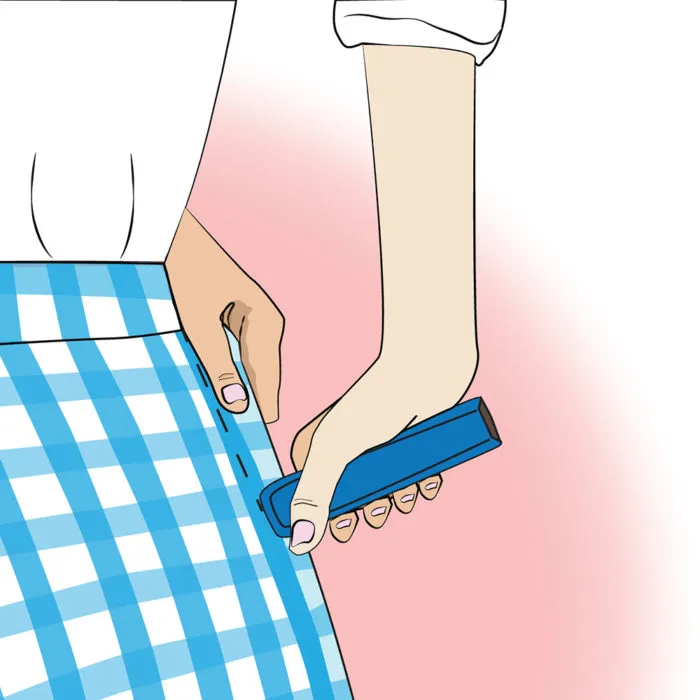
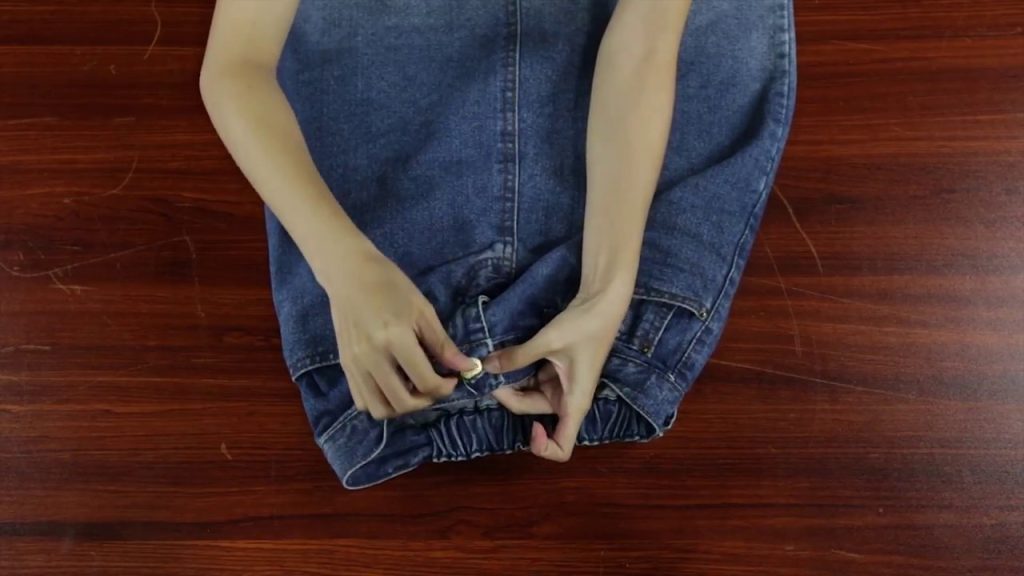
Jeans Buttons
Fixing a button on your jeans is a breeze, and no sewing is required. Just grab a tack button and, if you have a nice, clean hole where the old button used to be, insert the tack half of the replacement button from the inside of the jeans, making sure the pointy end pops out.
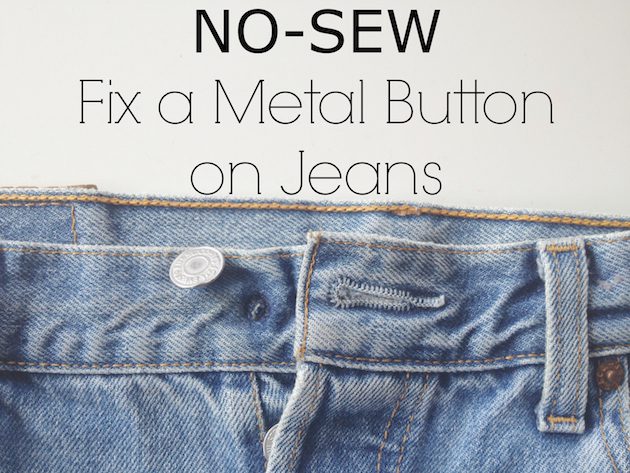
Place the top half of the button on the pointy end of the tack. If you have Herculean hands, you could simply squish the two halves together. But a few taps with a hammer or mallet on the rounded face will do the trick for the rest of us.
Broken Heel
Reviving your beloved heels is as simple as snagging some parts with a handy-dandy DIY project to ensure they strut with perfect balance. With these tips, you can squeeze out a few extra glorious miles from your cherished pair of heels.
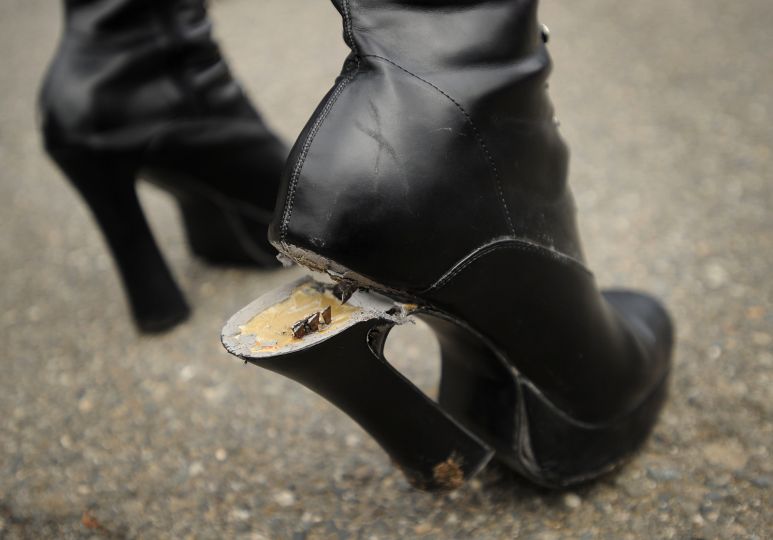
The power of glue shall come to your rescue. But hold your horses, dear, for the regular variety won’t cut it. We need something mightier, like the legendary super glue or the trusty shoe glue. Slather it on generously for an unyielding grip, but be careful not to overdo it and ruin your heels’ balance.
Leather Attacked By Mold
We’ve got a couple of culprits for mold on leather footwear. Sometimes, the shoes are stored incorrectly or are just old. So, step one: take those shoes outside. We don’t want those mold spores wreaking havoc indoors. Wipe away any surface mold with a cotton cloth drenched in hot water.
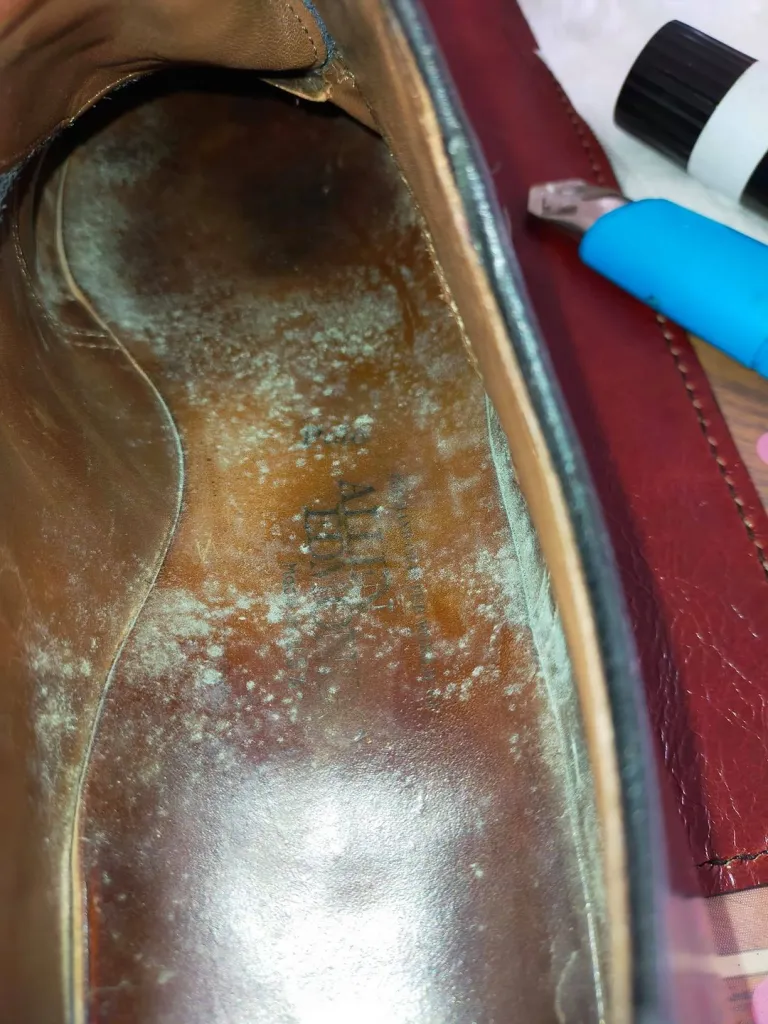
Once that’s done, let those shoes bask in the fresh air and sunshine, preferably outside. But hold on, we’re not done yet. Enter vinegar, the cheapest and most effective cleaner in town. Grab a cloth or sponge, soak it in vinegar, thoroughly wipe down those shoes, and let them air dry again.
Toothpaste Out of Clothes
You’ve probably experienced it more than once. You’re in a rush, vigorously brushing your teeth, and suddenly, white toothpaste specks decorate your outfit. To tackle this dental dilemma, arm yourself with a dull knife or a plastic edge, along with some clean white cloths, water, and liquid laundry detergent.
Gently lift the stain away from the fabric’s surface using the edge of a credit card or a dull knife, but refrain from rubbing, as that will only embed the toothpaste deeper. Instead, dip a clean white cloth into the detergent solution and delicately massage away the toothpaste residue.
Easy Hemming Technique
Revamping unraveled hems is a timeless sartorial solution. No need for a fancy sewing contraption; just a trusty needle and thread will do the trick. Slip into the skirt and determine the perfect length. This technique works wonders with pants, too.
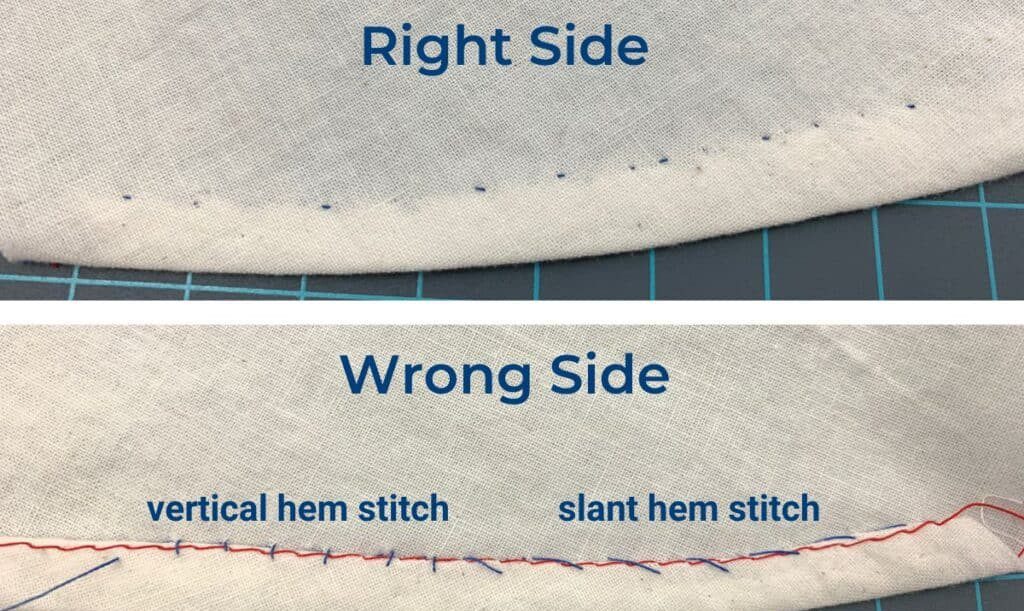
Secure the hemline with pins, then remove the skirt. Fold the hem and press it with a presser cloth, ensuring the crease is flawlessly aligned. Trim away any excess fabric, generously leaving room for stitching. Hand-sew along the upper edge of the hem using a slip stitch or a sleek machine straight stitch, et voilà.
Belt Loop
If you’re a belt enthusiast or have a knack for yanking your pants up by their loops, chances are you’ll eventually come across a loose or torn belt loop. Fire up the sewing machine and repair any holes before reattaching the loop.

Align the belt loop with its original position and start sewing, ensuring that your stitches follow the path of the original ones. Go back and forth, back and forth, until the loop is securely fastened to the patched fabric beneath it. Your jeans will be ready to rock with pride.
Pantyhose
Oh, the horror of discovering a painful run in your beloved pantyhose, but don’t worry, there’s a remedy. Prepare to witness the magical powers of clear nail polish, the newfound confidante of your hosiery. While it doesn’t reverse the damage, it can certainly halt the run from expanding.
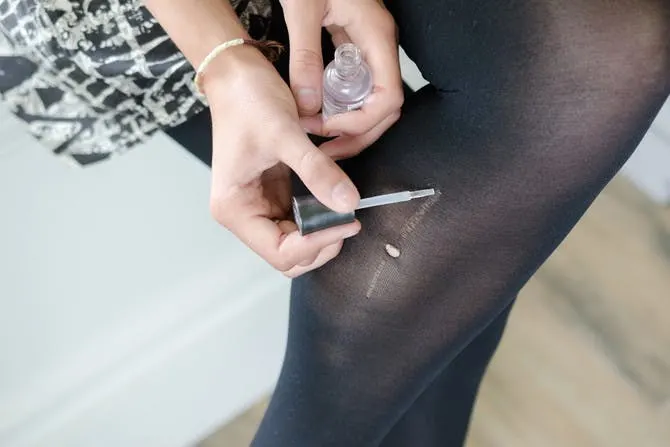
With a matching thread, you can skillfully stitch the whole thing and eliminate the damage, closing that unsightly hole with finesse. This technique works wonders on tights crafted from mesh, wool, or Lycra, and yes, even those tantalizing fishnet tights can be salvaged through the power of the needle and thread.
Button Fix with Paperclip
If you’ve ever been a proud member of the Boy Scouts or Girl Guides, you’ll understand the importance of being prepared for anything that comes your way. And for this fix, the unassuming paper clip reigns supreme. This little hero, so affordable and flexible, has the power to rescue you from countless sticky situations.
Imagine a button abandoning ship on your favorite jeans or trusty jacket. Just straighten the clip, shape it into a U, and thread it through the button’s holes and the fabric. Then, twist it and secure it with some tape to ensure it doesn’t play any pranks on you.
Broken Straps
Have you got a dress with straps that have gone rogue? You don’t need to be a sewing wizard to fix it up. You’ll have those straps back in place in no time. First, find the perfect spots to reattach the straps. Then, grab your needle and thread and get ready to work magic.
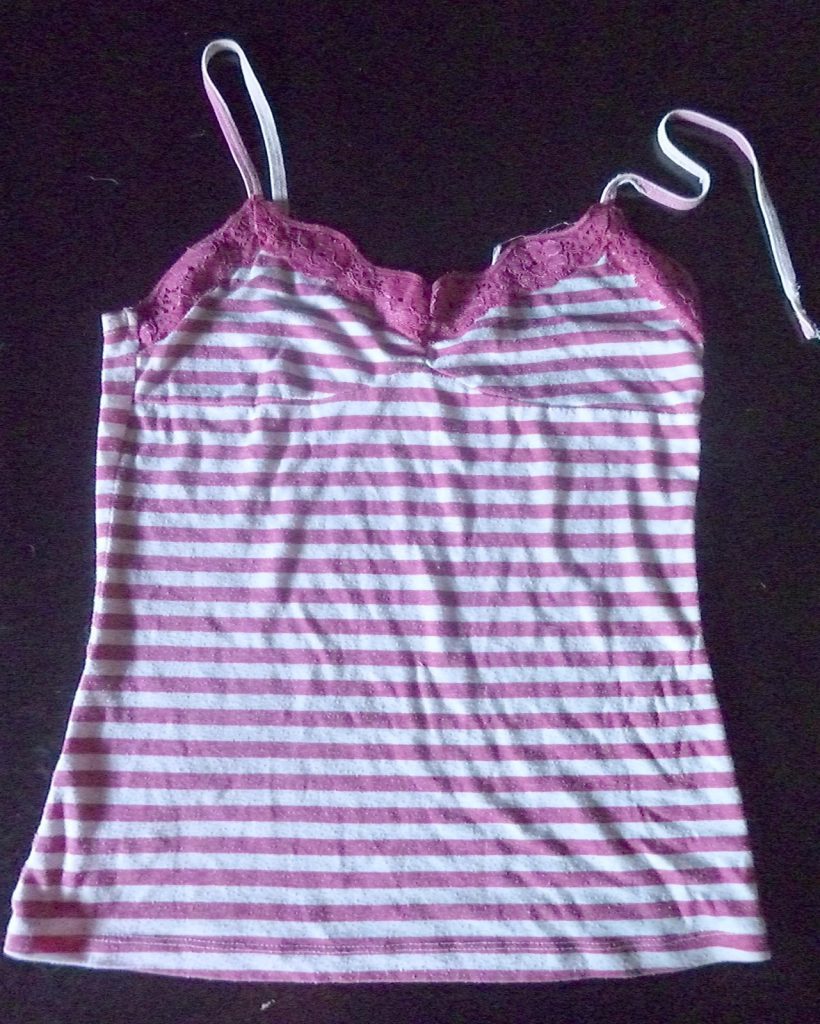
Start by poking the needle through the dress’s inside, ensuring it goes through both the strap and the fabric. Give it a good tug and repeat this process a few more times. This way, you’ll ensure those straps are securely fastened, ready to take on any fashion emergency.
The Under-Wire Nightmare
Replacing bras can be pricey, but straightforward solutions exist to fix an under-wire fiasco. If you’re in a hurry, grab a strip of moleskin and cover the hole. But if you seek a more robust solution, gather your tools: duct tape, a needle, thread, nail polish or glue.
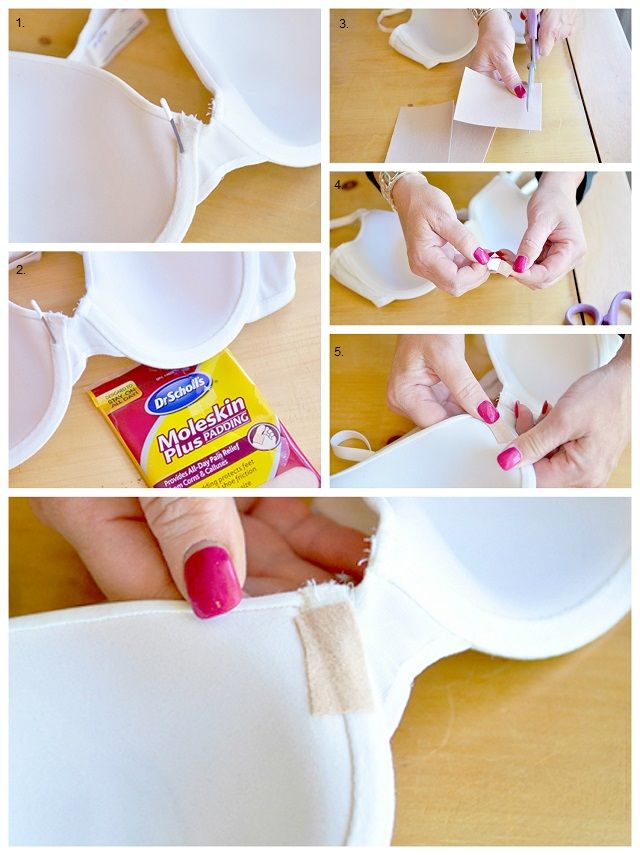
Nudge that wire back into place for a swift resolution, then wrap it with moleskin or medical gauze. Alternatively, embrace the power of duct tape, wrapping it around the wire, skillfully poking it back in, and stitching the hole shut with upholstery thread. Finally, apply nail polish or thread glue.
Reinserting A Drawstring
We all know the struggle of drawstrings slipping out of our clothes, especially when they take a spin in the washing machine. But there’s a clever trick to conquer this frustrating battle. Grab a trusty paper clip or a safety pin; ensure it fits snugly into the drawstring.

Use the safety pin to pierce the drawstring. Thread it through the casing, navigating the twists and turns until it emerges victorious from the other end. Tie a knot at both ends of the drawstring, ensuring it will never escape those holes again.
Never Lose A Button Again
We’ve all been there, haven’t we? You’re gearing up for a crucial day at the office or a high-stakes business voyage, and just as you’re about to slip into your go-to shirt, disaster strikes—a button is mysteriously absent. But fear not.
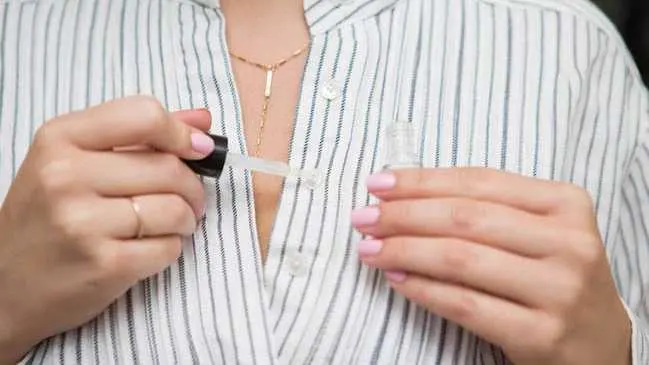
Brace yourself for the wonders of clear nail polish. Dab a bit of that glossy goodness onto the thread of the rebellious button. The clear nail polish swoops in, sealing those threads and putting an end to any unraveling shenanigans.
Preventing Colors From Fading
Good old water and soap slowly erode the rich colors of your beloved denim. And we found a way to preserve the youthful radiance of your jeans. First, get a bucket, go to the sink, and fill it halfway with cold water. Add one cup of pure white vinegar and a tablespoon of salt.
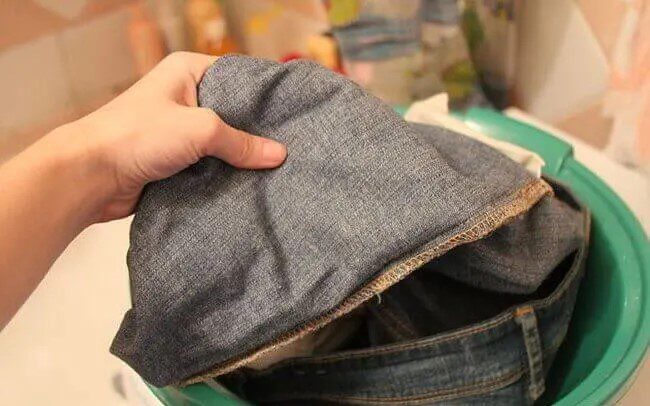
Submerge them in the mix of vinegar and salt for 15 to 30 minutes. This will seal the dye within the fibers of the denim. The vinegar components bind themselves to the vibrant hues, creating an unbreakable bond that defies the forces of time and washing cycles.
Dealing With Wrinkles
It’s time to say goodbye to those stubborn wrinkles by taking a spin in the dryer. Toss your crumpled clothes into the dryer machine, along with some ice cubes. Yes, you heard it right – ice cubes. The ice will melt as the dryer dances and twirls, transforming into powerful steam.

The ice will wage war against those pesky wrinkles. Crank up the heat to the highest setting and let the dryer work its magic for a mere five minutes. And just like that, ta-da. Your clothes emerge, refreshed and ready to be flaunted. No more ironing woes, just effortless style.
Unstuck A Zipper With Some Soap
Have you got a mischievous zipper on your jacket causing you severe frustration? Or, heaven forbid, your little one’s zipper is giving them a hard time? With this nifty clothing hack up your sleeve, you will solve this dilemma quickly.
You’ll unstick that stubborn zipper with the power of an ordinary bar of soap. Hold the fabric taut, glide the soap along the zipper’s teeth, and you’re done. Watch in awe as it slides up and down with the utmost ease. Remember to repeat this procedure after each wash to maintain that silky smoothness.
Fashion Versatility With Scarves
Scarves are the saviors of warmth in the frosty winter and the stylish accomplices of spring fashion. If you have a blanket scarf, you’ll be amazed by this ingenious tying technique. Drape it around your shoulders and cinch a belt around your waist. It’ll keep you cozy and gorgeous.
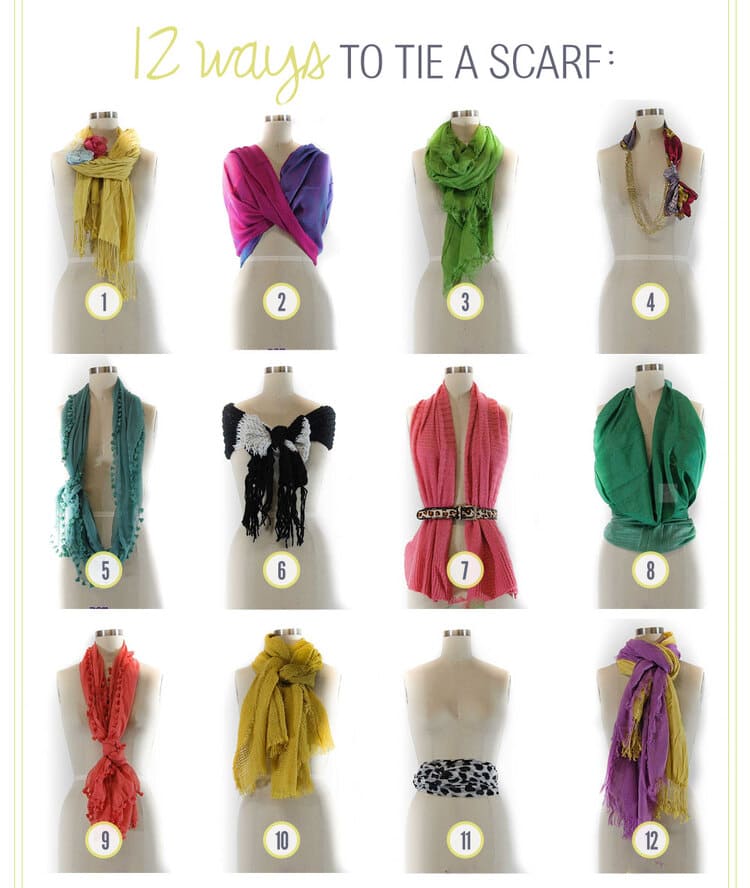
For a delicate touch, fold a large silk scarf into a triangle, gather clumps from the two sides and secure them with a hair tie. Even a pashmina can become an exquisite beach cover-up, requiring nothing more than wrapping it around your waist and tying the two top corners together.
Jeans Gap On The Back
The dreaded gaping waistband is like a fashion nightmare, especially when it comes to jeans. Not only does it feel like a constant battle with discomfort, but it also reveals too much skin. But there’s a simple solution to this sartorial conundrum.
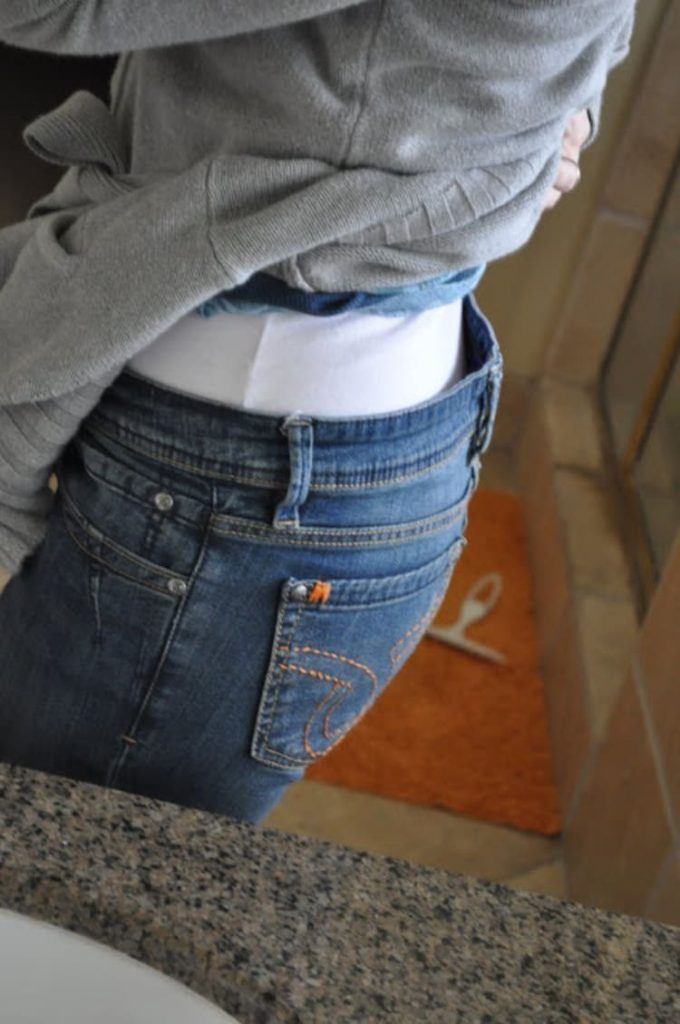
All you need is an elastic band and a touch of creativity. You can either slide the elastic into the waistband, ensuring a snug fit, or opt for a discreet attachment at the back of your pants. Your pants and your fabulous sense of style will thank you.
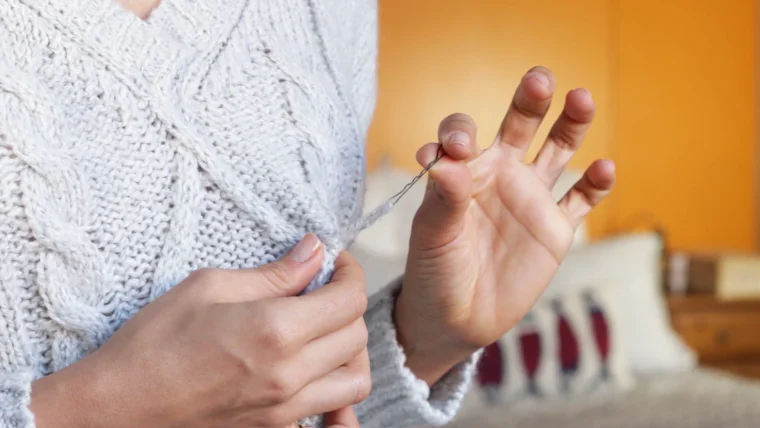
Sweater Snags
Oopsies happen, especially when it comes to those cozy knitted goodies. Loose yarn structures in sweaters and scarves are prime targets for snags and pulls. First, if the snag is still intact and hasn’t snapped away from the sweater on either end, it’s time to bring in the crochet hook again.
Create a little loop with the loose yarn and pull the end of the yarn through it. Make a tiny knot on the inside of your sweater so the snag stays put and doesn’t cause any more fashion emergencies. You can save your favorite knitted treasures with a bit of crochet hook wizardry.
Get Rid Of Oil Stains
For starters, slip a piece of cardboard behind the oil stain before treating it to stop it from soaking through and spreading. It will be more manageable if you remove the excess oil. Add hydrogen peroxide, a few drops of dish soap, and baking soda.
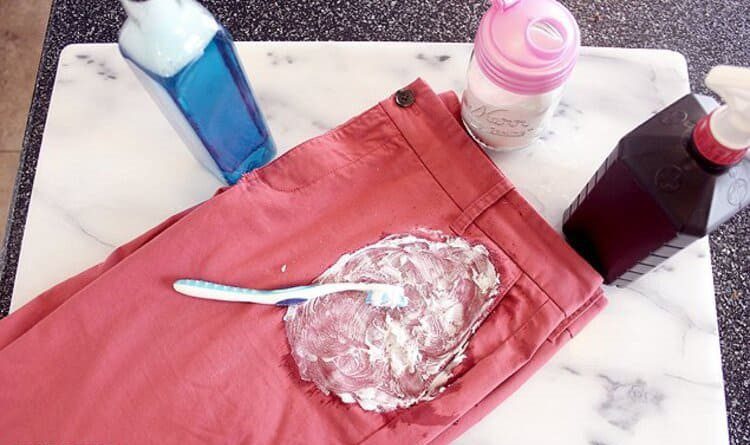
Use a tiny scrub brush or an old toothbrush to create a paste-like consistency. To allow the components time to break down and absorb the oil from the cloth, let the mixture lie on the stain for around 30 to 60 minutes.
Clothing Bags
You’re all ready to purge and arrange your closet. Why not use a pillowcase as a clothing bag to store your more fragile clothes or lesser-used goods? No sewing is required; a dress or jacket will fit depending on the pillowcase size.
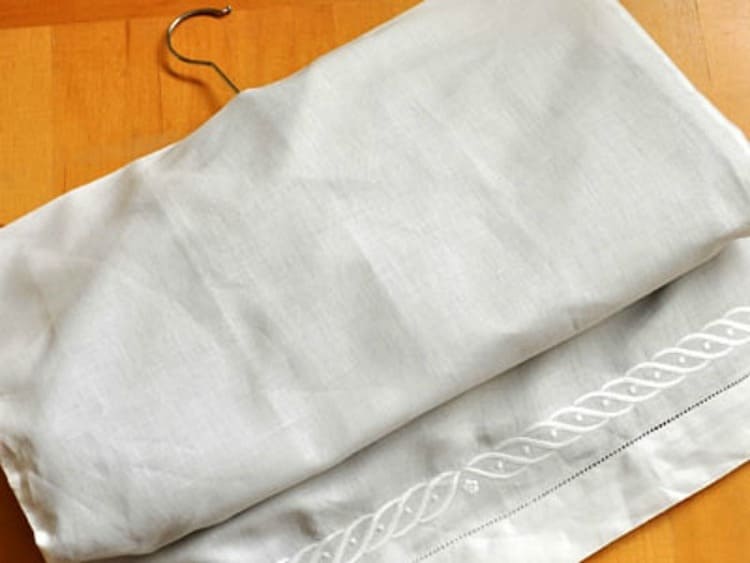
Vertically wrinkle the pillowcase by folding it in half. At the top crease, make a little triangular notch. This will make a hole for you to insert the hanger through. Attach the velcro strips to the pillowcases’ inside hems to wrap things up.
Bleach Stains
If you’ve ever been in a cleaning rage and unintentionally spilled bleach on your clothing, you’ll be relieved to hear that all is not lost. Depending on the extent of the bleach stain and the clothing’s color, there are many techniques to save your clothes. The best one, though, is using washing pens.
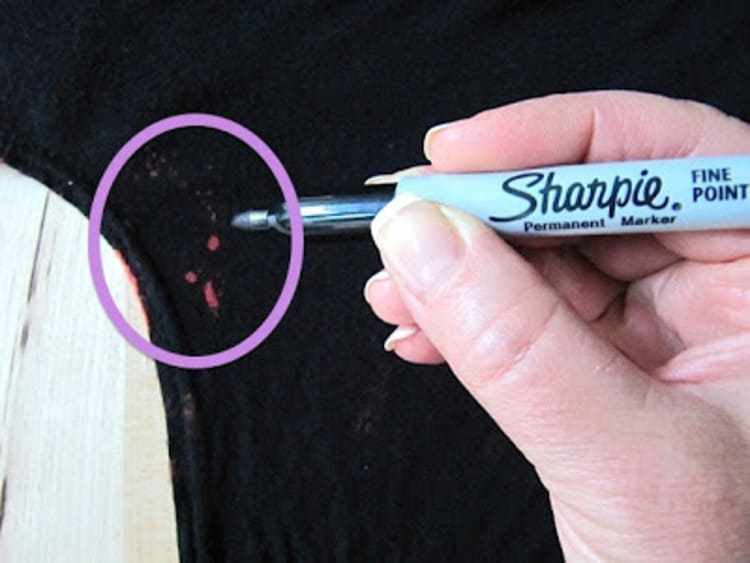
This would be a quick fix if you have a black outfit and the area is small. You can also use standard markers, which come in a variety of colors. However, you must ensure the pen color matches the fabric.
Save Your Jeans From Gum
Finding a wad of gum lodged in your coat pocket or plastered to the seat of your pants is never a pleasant surprise. Fortunately, you can eliminate that gooey mess with several common home materials, such as vinegar, ice, or rubbing alcohol.
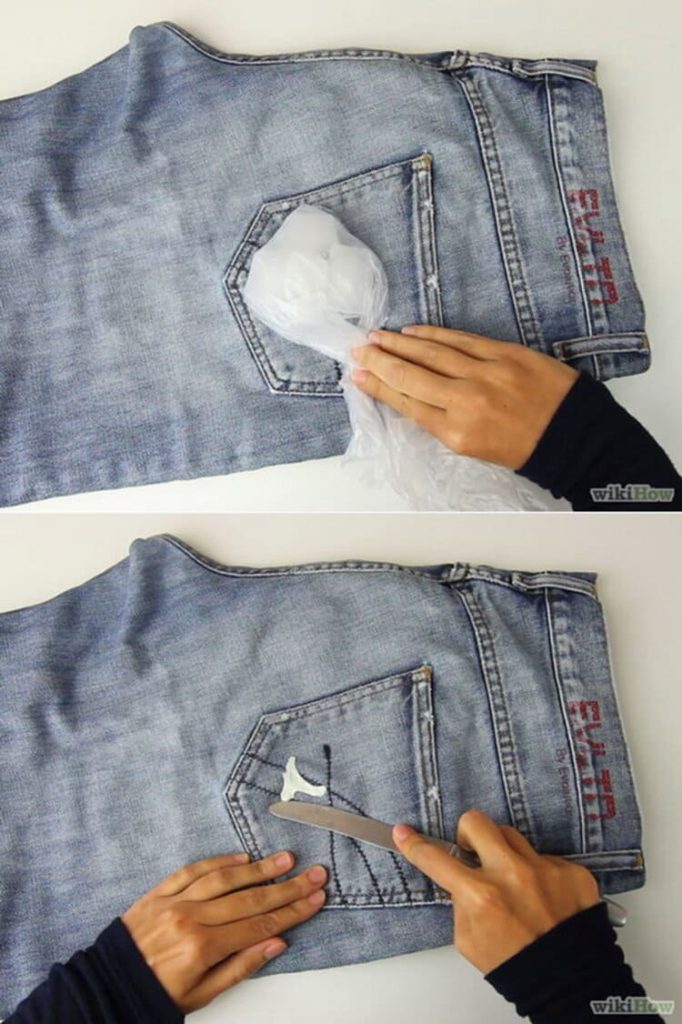
These gum-cleaning methods will work well at work, at home, or on the go. The magic of this hack lies in freezing the gum with ice cubes or placing the gum-studded item in the freezer for about an hour with the gum face up. When the gum has dried, peel it off.
Makeup Stains
You’ll surely get some on your clothes if you wear makeup. It’s also no joke that removing it from your clothes can be a genuine nuisance. Fortunately, makeup remover—which you almost certainly already own—is the perfect solution for various cosmetic stains.
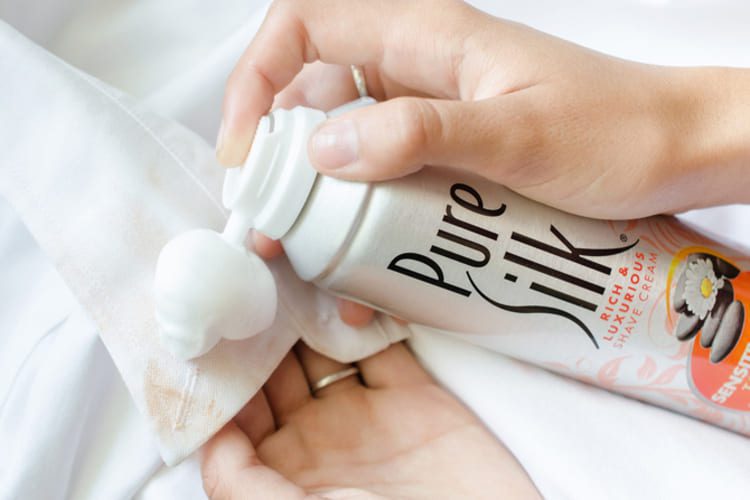
Note that if the product is waterproof, like eye mascara, you must first break it down with an oil-based remover. An alcohol-based cleaning remover is a suitable choice if it isn’t waterproof. It all comes down to the right chemistry.
Sweater Pills
The easiest and most efficient way to depill your sweaters is with a clothing shaver. To remove all of the fuzz, turn on the machine and glide it around the cloth in little circles. For bigger patches of cloth with more tenacious pills, use a lint roller to help.
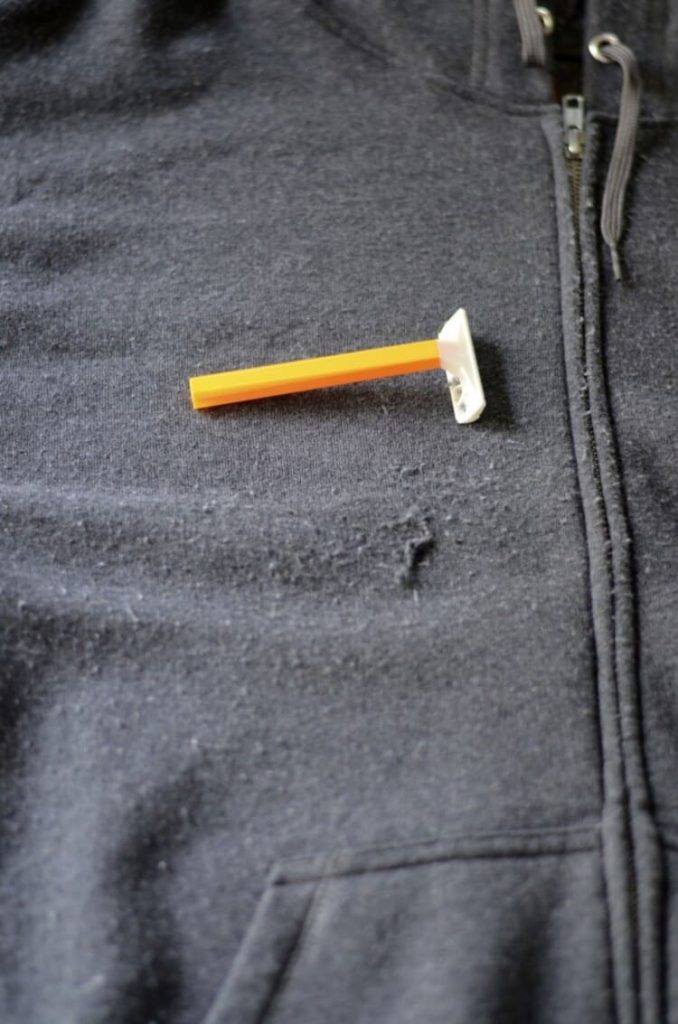
Tweezers or disposable razors also remove each pill from the sweater or any wool clothing piece. To prevent damaging the fabric, be careful not to push too firmly when doing this. To guarantee that no fuzz is left behind after removal, use magnifying glasses while carefully removing the pesky pills.
High Heels Makeover
On a whim, we have all bought high heels in our lifetime. Who could resist such a temptation when they were adorable and on sale? However, after a few days or weeks, we might realize they aren’t exactly what we dreamed they’d be. Then, it’s time for a cool hack.
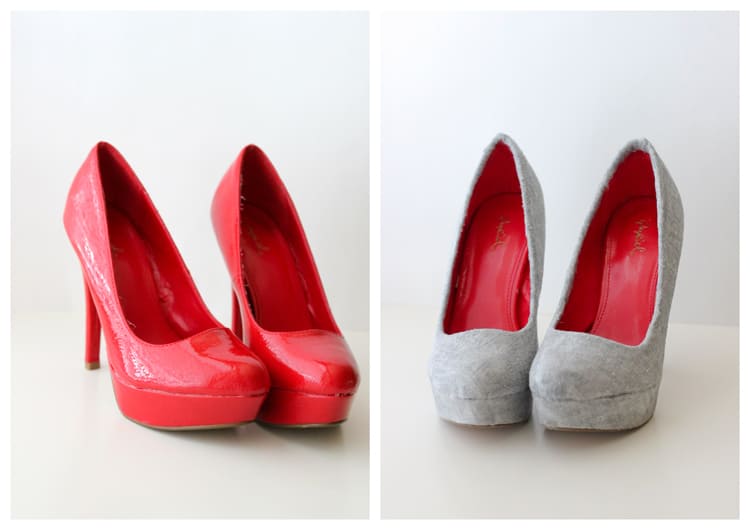
Make sure you have enough of mod pudge on hand before you start. Better still, if you have a little rotary cutter, you can make clean, accurate cuts. This fun project allows you to customize your shoes any way you like.
Unshrinking Clothes
Thousands of TikTokers revealed an interesting way to unshrink clothes in videos that went viral under the hashtag #laundryhacks. Part of its appeal is that it can save you “hundreds of dollars” on replacing shrunken clothes, and who doesn’t want that?
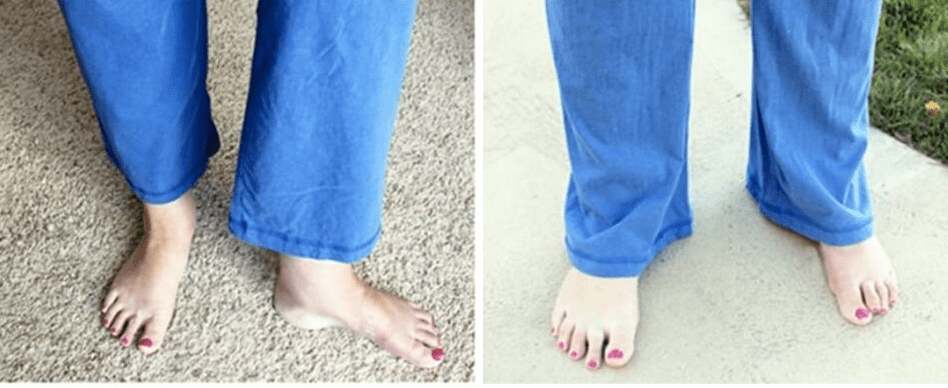
To unshrink them, combine 1 tablespoon of conditioner into a small bucket filled with warm water. Dive the clothing in the mixture and let it rest for 30 minutes. Finally, rinse the conditioner out of the item and gently stretch it to the appropriate size. Allow it to air dry before wearing.
Waterproof Your Shoes
Rain, snow, hail, and whatever else Mother Nature may conjure up can – and will – test the quality of our shoes. For people with limited time, commercial solutions to waterproof shoes are available. For those who are more crafty, you can make a simple waterproof buffer for your footwear using candle wax and a hair dryer.
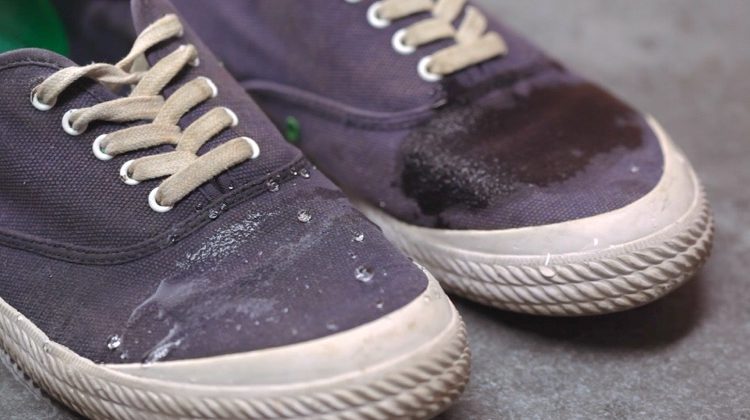
Warm the wax slightly before rubbing it onto your shoes. Then, using a hair dryer, let it melt gradually. If you leave the dryer on high heat for an extended period, the shoe material may break. This applies to almost any fabric other than synthetics.
Removing Sweat Stains
Even though sweat stains don’t need to be brand-new to be treated appropriately, it’s better to deal with them once you realize they’ve developed to stop the annoying molecules from penetrating the fabric further. Eliminate dry sweat stains by soaking t-shirts in white vinegar and water solution.
After this, make a paste by combining baking soda, salt, and hydrogen peroxide and apply the paste to the unsightly sweat stain. Let the mixture rest for a while before using an old toothbrush to scrape the stain. Throw the tee in the washing machine with hot water and let it wash as usual.
Reshaping Caps
These accessories often fall victim to unfortunate circumstances, whether it be a sporty baseball cap, a luxurious leather hat, or something in between. Sometimes, they find themselves squashed within the confines of a suitcase, or perhaps an unsuspecting soul decides to perch upon them.

Sometimes, they’re smothered in the depths of a forgotten closet, trapped within a crumpled box. So, here’s a quick solution. Fill a small pot with water and let it boil. Then, perch your hat atop this steamy pot, allowing the rising vapors to work their magic and restore your hat to its original splendor.
Trendy Cover-Ups
When our collection of tees starts feeling lackluster, it’s time to unleash our inner DIY guru. All you need are a pair of scissors, cute fabric, fusible web paper, an iron, and your trusty T-shirts. Cut the material into your desired shape, and cover it with the fusible web paper.
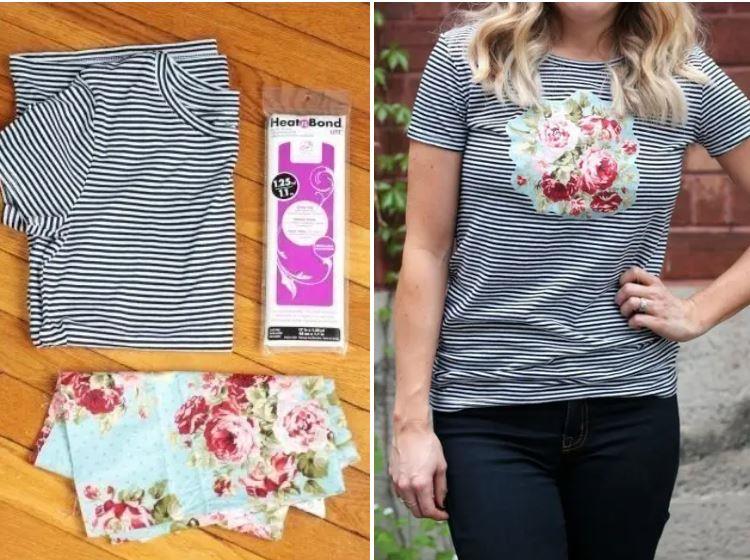
Set the iron to medium heat and press the fabric for a few seconds until it bonds like a match made in fashion heaven. Trim away any excess of paper and peel it off. Place the cloth on your shirt, ensuring the shiny side faces down. Iron the spot for a few seconds.